Setting up Jenkins for Github and Xcode, with Nightlies

Jenkins? What? Why?
When you work alone on a several projects that share code, it’s easy to unnoticeably break the build of one project with a change for the other, or introduce some specific dependency on a quirk of your main work Mac, or lose data by referencing a file outside the repository instead of copying it in. Since that’s annoying, I decided to set up Jenkins, a continuous integration system, on my Mac mini that serves as my EyeTV DVR, media centre and home server.
It’s not that hard, but some of the details are a bit fiddly and under-documented, so I thought I’d write down how I made it work before I forget it (and for when I next have to set it up again). My source code is in a Github repository, and while I was at it, I wanted to set it up that one of my open source projects gets nightly builds FTPed onto its web site (but only when I’ve actually changed something).
Initial Install
Jenkins is a Java application. Since Java no longer comes pre-installed on Mac OS X, if you’re not using any other Java applications, you should open a Terminal and type in java, which will make Mac OS X notice Java is not yet installed and download it. Also make sure you’ve installed Xcode on your Mac. The version from the app store is fine, but make sure you install the command line tools under Preferences > Downloads on the Components tab, so Jenkins will be able to find git.
Next, you’ll want to create a dedicated user account that Jenkins will run under. The standard installer does that for you, but it only creates a command-line account, which makes it very hard to set up all the certificates, so go to System Preferences‘s Users & Groups section, and create a new account and name it “Jenkins”. Make sure you enter “Jenkins” with a capital ‘J’ under “Account name”. Also, right-click the account in the list on the left and choose “Advanced Options…”. Replace the standard home directory “/Users/Jenkins” with “/Users/Shared/Jenkins”, which is what the standard installer will use.
Now that all is ready, go to jenkins-ci.org, and right on the front page you’ll find a Mac OS X direct download link that gives you a nice Mac installer package. Run that. Jenkins will be installed so it automatically launches at system startup, and it will run on your Mac on Port 8080. So make a note to later forward that port through your router to your Mac so it is accessible from the outside (you will need a dynDNS domain-name connected to it, or a static IP, or Github won’t be able to notify you of changes). But not yet! First you have to secure Jenkins with a password.
Open your browser and point it at http://localhost:8080 (your Mac’s Bonjour name is fine as well, as will be your external domain name or IP, when you later set up the port forward). And after a short wait you’ll get to Jenkins’ front page. There’s a breadcrumb bar at the top which pops up a little menu if you mouse over the initial Jenkins breadcrumb:
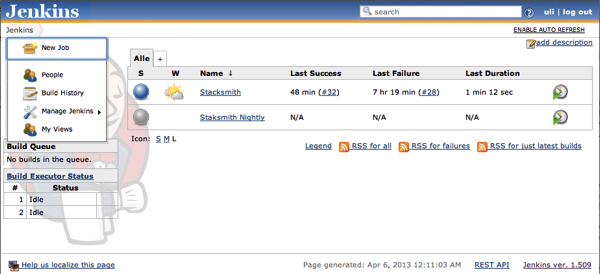
Under Manage Jenkins, click Configure Global Security and there, check Enable Security, but do not save yet! If you do, Jenkins will happily lock you out. You haven’t created a user login yet, so you’ll never be able to get back in again without editing the config.xml in the Jenkins user folder and manually deleting the three security-related lines in there.
Next, we’ll have to set up permissions for the new user login, and then actually create it. So first tell Jenkins to use Jenkins’s own user database and Allow users to sign up under Security Realm. Then check Matrix-based security and type whatever user name you want into the little User/group to add: field and click Add. Then make sure that all checkboxes are checked for this user login, all the way to the right, and all are off for “Anonymous”.
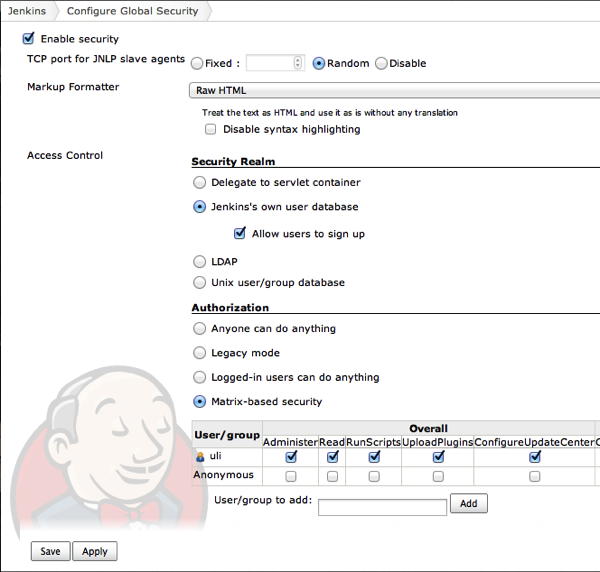
Now that that’s done, you can save. Then click Sign up in the upper right and sign up under the user name you just gave all the permissions to. Yay! We have a valid user! Now go and turn off the Allow users to sign up checkbox again so nobody else makes themselves an account on your server.
Git support
By default, Jenkins only does SVN. But it has a nice big list of plug-ins that you can easily install. Go to the menu, Manage Jenkins > Manage Plugins and go on the Available tab. There’s a boatload of plugins there, but we only care about one for now: Github Plugin. Find it (there are a few with similar names) and install it. Check the box to restart after the installation.
If you’re curious about a plugin, just click its name. It will show a web site with documentation and setup instructions. Installing a plugin means that its checkboxes and text boxes show up in the Configure System section and each job’s Configure section. So let’s go to Configure System.
Take note of the Home directory mentioned at the top. This is where you’ll later be installing your Github certificates so Jenkins can check out code. Also, since you want your Jenkins externally accessible, scroll down to Jenkins Location and enter your external URL or static IP as the Jenkins URL there.
Between those two is a Git category. Click the lone Git installations… button there. If you installed the Xcode command line tools as mentioned, you will not see a red error message here and it will have found git in the default location. Otherwise, set up the search paths to point wherever you have git installed.
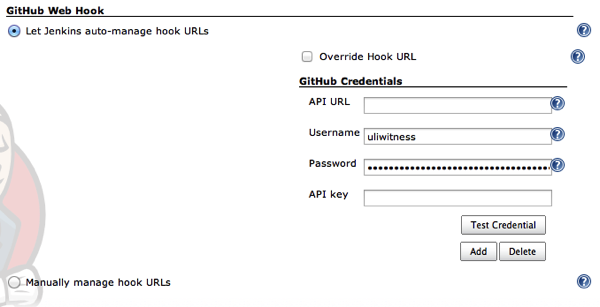
Now go to Github Web Hook and check Let Jenkins auto-manage hook URLs and enter your username and password in the fields that show up. This is needed so Jenkins can install a script that notifies it whenever a new commit has been pushed, so it’ll start a build. Click Test Credential to make sure that works.
Setting up a job
In Jenkins, everything that is built periodically is represented as a Job. To create a new job, click New Job in the upper left on the Jenkins home page. In the page that follows, choose a name (but be sure not to use spaces, as this name will be used for the folder in which Jenkins will work, and you’ll have much less trouble with a shell-script-friendly name), and select “Build a free-style software project”.
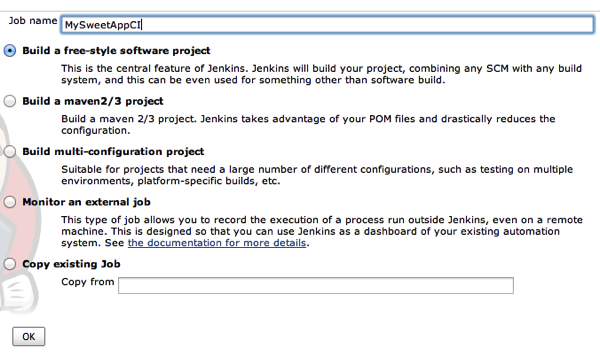
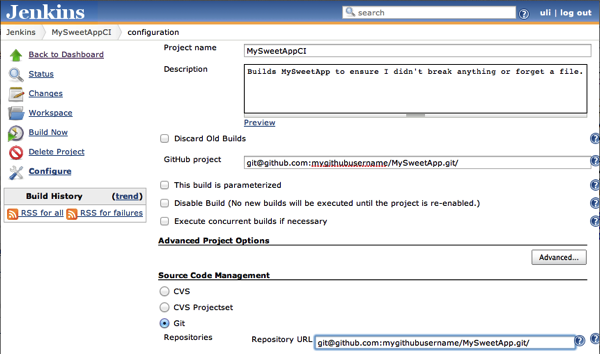
Click OK, and you’ll get to that job’s Configure page. Select Git under Source Code Management and enter the URL you see on Github under SSH for your repository twice, once in Github project at the top, and as the Repository URL under Source Code Management:
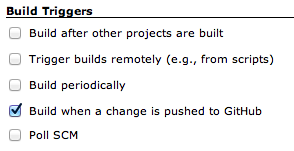
And finally, check Build when a change is pushed to Github under Build Triggers:
Now you’ve set up Jenkins so it will try to check out your code whenever a change happens. Next, we will have to tell it how to actually build it. We do that in the Build section. Click Add build step and choose Execute shell. You’ll get a text field in which you can enter a shell script.
This shell script will be run in the folder into which your repository was checked out. This will be a folder named after your job in the workspace subfolder of your jenkins user’s home directory. So if your Xcode project file is at the root of the repository, you can just call xcodebuild there. If it’s in a subfolder, you can cd SubFolderName and then call xcodebuild.
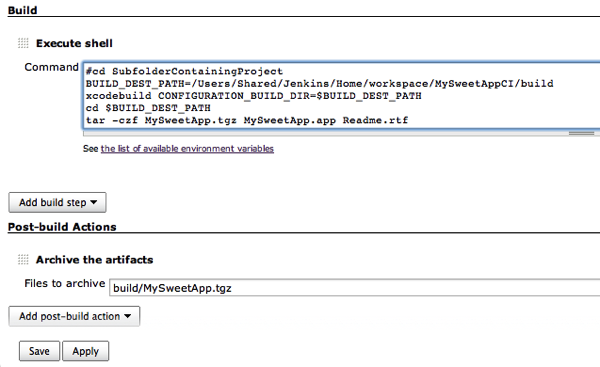
One problem with Xcode is that it builds into a hardly-predictable folder somewhere in Library. Jenkins requires all built files to be inside a job’s workspace folder, or it won’t let you archive them. So we need to override it to e.g. build into a build folder inside the checkout. To achieve this, we set the CONFIGURATION_BUILD_DIR environment variable when we call xcodebuild. Note the example screenshot hard-codes the path, while I now use one of Jenkins’ environment variables:
BUILD_DEST_PATH=${WORKSPACE}/build
The script above, once it is done, grabs the files from the build folder and compresses them into a single archive. This is so we can archive the built file somewhere, for future reference. The actual archiving is done under Post-build Actions where we select Archive the artifacts from the Add post-build action popup. Here again, the path is relative to your job’s workspace subfolder, so if you want to archive something added to the build folder, use a relative path like build/MySweetApp.tgz.
Note that Jenkins tries to be helpful and displays red warnings that it can’t find the file to archive right now. At this point, that’s OK. There is no checkout, and we’ve never archived anything. However, later, this can be very helpful in figuring out what’s gone wrong, if the checkout works, but building fails or so.
Done? Then save. You could also click Build Now on the left (or the little clock with the green “run” arrow on it anywhere next to your newly-created job on the home page), but it would fail. Apart from errors in your script, there would likely be two issues, which you can see in the menu that shows up when you hover the mouse over any failed build and click “Console Output” in the menu that shows up:
- Github will complain that you don’t have permission/are missing certificates
- Xcode will complain you haven’t accepted its license agreement.
Remember when you set up access to Github for the first time and you had to create and install certificates? You’ll have to do that for your Jenkins user, too. Or you could simply copy the hidden .ssh folder in your user directory over into the Jenkins user’s home folder. Note that this isn’t e.g. /Users/Shared/Jenkins/Home like in the standard installation, but actually one folder up, so you want your certificates in /Users/Shared/Jenkins/.ssh/.
Note you’ll have to
sudo cp -R ~/.ssh /Users/Shared/Jenkins/
sudo chown -R jenkins /Users/Shared/Jenkins/.ssh
to make the folder accessible to the Jenkins user. If you created a real GUI-user for jenkins, you can simply run Xcode once and accept the license agreement once. Alternately, as the error message from xcodebuild will tell you, you can do
sudo -u jenkins -i
xcodebuild -license
exit
To view the license. While you’re in the license screen, you can skip to the end by typing an uppercase G (you’ve already accepted the license agreement when installing the command line tools from inside Xcode, after all), then type in agree, as directed.
If you now click Build Now on Jenkins’s home page, it should work. The job should show up in the Build Queue, the ball at its left should flash for a while, and the similar ball next to the job in the list of jobs on the home page should be blue. If it is red, click the Job’s name, and in the Build History on the left mouse over it and choose Console Output to see the log and error messages.
If a build was successful, you can view the archived files (“artifacts”) by clicking a job on the home page, and then one of the individual build times listed at the bottom of its page.
Setting up nightly builds
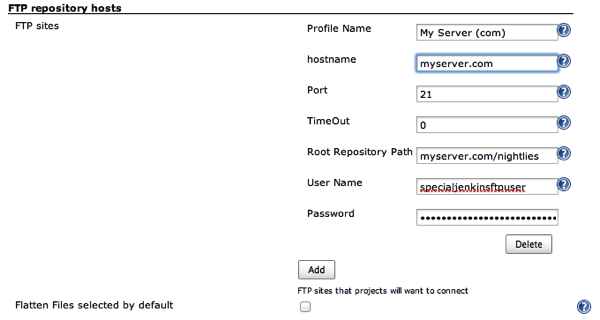
If you want to make nightly builds and not just have them in Jenkins, but actually upload them to an FTP server somewhere, you will need the FTP Publisher Plugin. Install it, then go into Manage Jenkins > Configure System and scroll to the new FTP repository hosts section. You can create a preset for each server you have. Since Jenkins is publicly accessible, I recommend creating a separate user for Jenkins and restricting it to only a nightlies folder on the server, and no CGIs. That way, should Jenkins somehow be hacked, people at least can’t use the password and login to deface the rest of your server (even though they *can* replace the downloads).
Once you’ve added your server, create a new job (e.g. MySweetAppNightly, but this time check Copy existing Job and type in the name of your regular CI job as the template (e.g. MySweetAppCI). Then just add a new action to Post-build Actions, by choosing Publish artifacts to FTP from the Add post-build action popup. Select your server from the FTP site popup and write the relative path name of the TGZ archive you set up in Files to upload (in our example, that would have been build/MySweetApp.tgz). Leave the Destination-field empty, unless you want to upload into a subfolder of the folder you set up in System Configuration. If you are building into a subfolder (like in our example build/MySweetApp.tgz), you may also want to check Flatten files, or it will upload into a subfolder of the same name on the server.
Now, what this would do right now is upload every change to the FTP server. The server would be strained unnecessarily if your application contains large assets. We want a nightly build. How do we do this? We scroll up to Build Triggers, turn off Build when a change is pushed on Github, and check Poll SCM. Now, we could just pick Build periodically, which is almost identical, but the advantage of Poll SCM is that it won’t build and upload if nothing has changed since the last build. (It would also be the right option if you host somewhere else than Github and can’t use the plugin and don’t want to write your own post-commit hook.
Click the question mark next to the Schedule text field to see the syntax, it is pretty much like cron. I picked 4 AM at night, every day of the week. That’s a time where I’m usually not in the middle of a series of check-ins, so chances are this should build.
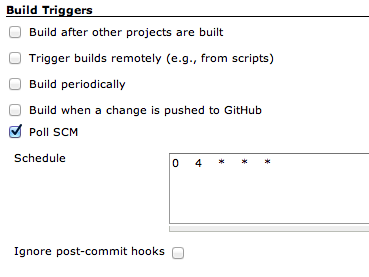
If you hardcoded the path in the Build section, be sure to rename the job in the path there, then save and click Build Now to generate and upload your first nightly build.
Getting notified
Of course, all of this would be pretty pointless if we had to check Jenkins after every commit. Luckily, Jenkins can e-mail you. You need an e-mail account somewhere (I recommend creating one dedicated to Jenkins, again for security reasons, but any old Hotmail account would work). Scroll to “E-Mail Notifications” in Configure System and click the Advanced button, check Use SMTP Authentication, then enter the same user name, password and SMTP server you would specify to use this account from Mail.app or another e-mail client. Check Use SSL if your mail hoster supports that.
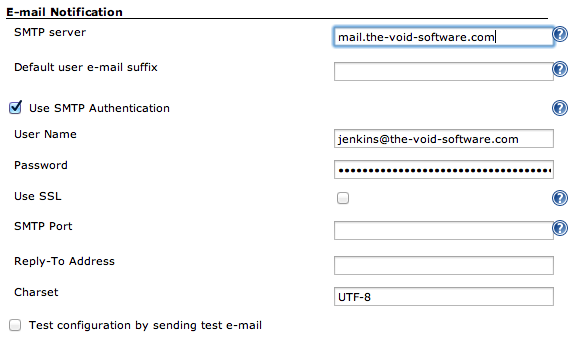
Then check Test configuration by sending test e-mail and enter whatever e-mail addres you want to send a test e-mail to in Test e-mail recipient and click Test configuration. If you mis-configured something, you’ll get Java throwing up backtraces in red all over your window. Enjoy.
Now, all that’s left is adding a E-mail Notification Post-build action to each job. Happy continuous integration, and a happy new year.
I also installed the Twitter plugin and added that as a Post-build action to notify me whether the build is broken. It is pointed at a protected Twitter account that only I can follow. You have to run a little Java command-line app to get the API access tokens needed for Jenkins to talk to Twitter, and paste those into text fields on Jenkins’ System Configuration, but that’s as complicated as it gets.
Certificates and DeveloperID Builds
If you want to build your Mac executables for distribution outside the Mac app store, you will need to log into your Jenkins user and open Xcode, and there go into the Organizer. Click Refresh in the Provisioning Profiles section (click OK in any App Store certificates not existing error messages it may put up if you only want to go outside the MAS, or you work Mac-only and not iOS).
Next, click your team. If it says there are no private certificates across the top, go to a Mac that has all your certificates already set up for development, and in the Organizer choose Editor > Developer Profile > Export Developer Profile… to export your private keys as a password-protected .developerprofile file. Copy that file over to the Jenkins user and double-click it there, and Xcode will ask for the password and install your certificates.
Now, verify that everything works: Open the project you want to build for developer ID. Go into the project‘s build settings and set the Code Signing setting to your Developer ID Application certificate. Build the project, clicking Always allow if Xcode asks for permission to use your private key to sign the application. If the build fails with an error like “timestamps differ by 205 seconds — check your system clock Command /usr/bin/codesign failed with exit code 1″, you probably dawdled too long in the confirmation dialog. Just build again and it should work.
If codesign fails trying to sign a file that doesn’t exist, you probably have a target that doesn’t produce a file, like a target that runs a shell script to generate a header containing the build number. Since we’re overriding the code signing setting for the entire project, it will try to sign that nonexistent output file. One way to satisfy it is to add a line like touch ${CODESIGNING_FOLDER_PATH} to the end of your script, which will create an empty file for codesign to sign.
Now that we know you have code signing set up correctly, we simply modify the call to xcodebuild in the job you want to have signed for Developer ID:
security unlock-keychain -p 's3kr1tp4ssw0rd' ~/Library/Keychains/login.keychain
xcodebuild CONFIGURATION_BUILD_DIR=$BUILD_DEST_PATH  \
  CODE_SIGN_IDENTITY="Developer ID Application: Joe Shmoe" \
  -configuration Release \
  clean build
The first call to security unlock-keychain does just that: Give xcodebuild running under Jenkins access to the keychain containing the keys it needs for code signing. Here you need to specify the keychain’s password, which is not a very secure thing to do, but can’t really be avoided in this case. At some point, the server *will* need access to your keys to build.
For a tiny bit of extra peace of mind, you might want to change the password of your keychain to be different from the account’s login password using the Keychain Access application. That way, if someone somehow manages to see this script and the password to the keychain, they still can’t log into your build tester to actually use it.
Alternately, you could run the Jenkins server that is exposed to the outside and manages the job on a different Mac (or at least as a different user?) than the actual build server. Jenkins allows that, so you can e.g. have one Jenkins web interface to build Mac, Windows and Unix software.
The second call is the same as our previous xcodebuild call, with three parameters added:
- The first one does in script what we did manually for testing in the GUI: It overrides the “Code Signing:” build setting with the Developer ID certificate (Insert your name here).
- The second one makes sure we don’t build with whatever configuration was last set, but instead make a release build, with optimizations and such. You could also specify that for other cases, if you wanted, to make sure e.g. stuff you remove from release builds doesn’t break the debug builds or vice versa.
- The third makes sure we clean before we build. This makes sure you don’t get any leftover files from a previous build (e.g. script-generated header files), but is also slower than an incremental build. You would probably also want to do this for nightly builds, but probably not for a CI build that gets triggered a lot, unless your project is very small.
Including the job number
For my nightly builds, I wanted to have a monotonically increasing version number. To add this is fairly easy: Just pass a few more settings overrides to xcodebuild:
  GCC_PREPROCESSOR_DEFINITIONS="BUILD_NUM=${BUILD_NUMBER} BUILD_MEANS=nightly" \
  INFOPLIST_PREPROCESSOR_DEFINITIONS="BUILD_NUM=${BUILD_NUMBER} BUILD_MEANS=nightly" \
The first line includes the build number that Jenkins uses for this job as a #defined constant accessible to your source files. The second does the same for projects that you have set to preprocess their Info.plist file (e.g. to include the build number in the CFBundleVersionString). You can also define other constants, separated by spaces, like BUILD_MEANS in this example, to e.g. somewhere display that this is a nightly build. You can provide default values for manual builds in a header that you include in those source files that need them, or in a prefix header for your Info.plist:
#ifndef BUILD_NUM
#define BUILD_NUM     0
#endif
#ifndef BUILD_MEANS
#define BUILD_MEANS   manual
#endif
And this should cover everything you typically need to do on your new continuous integration Mac.
