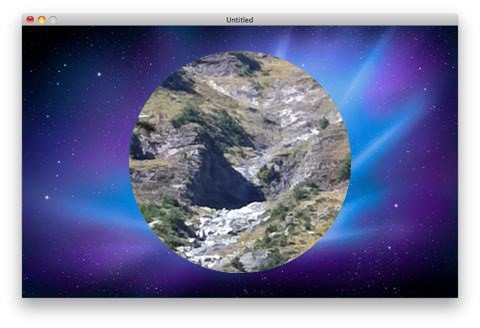
Custom CoreAnimation transition effects with CATransition and CIFilter

One of the cool things about CoreAnimation is that you can return a CATransition object from your NSView's -animationForKey: method and use it to apply nifty animations to changes in your view. You can do this for the obvious properties, but you can also do it for the property "subviews", which means that you can hide/show/change a whole bunch of subviews of a container, then have it all animate in together with a nice effect. Even better: Those effects all run on your graphics card, so they're fast and can be done while your program is preparing the next screen or tearing down the previous one, or whatever.
Now, CATransition is very easy to use, but it has one downside: It supports about four different transitions: kCATransitionFade, kCATransitionMoveIn, kCATransitionPush and kCATransitionReveal (which can be configured to yield a few variations, hence the "about"). You can get a few more transitions by specifying a filter (an object of class CIFilter) instead of a transition type and subtype string. However, there are not many dedicated transitions among these filters: bars swipe, copy machine, dissolve, flash, mod and swipe. 10 transitions plus a few variations like the angle they happen at.
So what if you want an effect that isn't in that list? Well, luckily CIFilter is extendable. There is some pretty nice documentation on writing your own filters using the Core Image Kernel language (not much different from OpenGL shading language), but sadly not much information on how one creates one for use as a transition. Luckily, it is very easy once you know what to do.
First, you create a CIFilter subclass. This usually consists of the following boilerplate code:
@interface ULIIrisOpenFilter : CIFilter
{
	CIImage *inputImage;
	CIImage *inputTargetImage;
	NSNumber *inputTime;
}

@property (retain) CIImage* inputImage;
@property (retain) CIImage* inputTargetImage;
@property (retain) NSNumber* inputTime;

@end
Where inputImage is the image that is on the screen before your effect starts, inputTargetImage is the image that should be onscreen once the effect has finished, and inputTime is the percentage of the effect (i.e. 0.0 means you show inputImage, 1.0 means you show inputTargetImage, anything in between depends on your effect, but a crossfade at 0.6 would e.g show 40% of the source image blended with 60% of the destination image).
Here's the implementation of this class:
@implementation ULIIrisOpenFilter

static CIKernel *sIrisFilterKernel = nil;

+(void) initialize
{
	[CIFilter registerFilterName: @"ULIIrisOpenFilter"
 		constructor: self
 		classAttributes: [NSDictionary dictionaryWithObjectsAndKeys:
			@"Iris Open Effect", kCIAttributeFilterDisplayName,
 			[NSArray arrayWithObjects: kCICategoryTransition, nil], kCIAttributeFilterCategories,
			nil]
	];
}

+(CIFilter *) filterWithName: (NSString *)name
{
	CIFilter *filter = [[self alloc] init];
	return [filter autorelease];
}

-(id) init
{
	if(sIrisFilterKernel == nil)
	{
		NSBundle *bundle = [NSBundle bundleForClass: [self class]];
		NSString *code = [NSString stringWithContentsOfFile: [bundle pathForResource: @"ULIIrisOpenFilter" ofType: @"cikernel"]];
		NSArray *kernels = [CIKernel kernelsWithString: code];
		sIrisFilterKernel = [[kernels objectAtIndex: 0] retain];
	}
	self = [super init];
	if( self )
		inputTime = [[NSNumber numberWithDouble: 0.5] retain];

	return self;
}

-(void) dealloc
{
	[inputImage release];
	[inputTargetImage release];
	[inputTime release];

	[super dealloc];
}

-(NSDictionary *) customAttributes
{
	return [NSDictionary dictionaryWithObjectsAndKeys:
		[NSDictionary dictionaryWithObjectsAndKeys:
			[NSNumber numberWithDouble: 0.0], kCIAttributeMin,
			[NSNumber numberWithDouble: 1.0], kCIAttributeMax,
			[NSNumber numberWithDouble: 0.0], kCIAttributeSliderMin,
			[NSNumber numberWithDouble: 1.0], kCIAttributeSliderMax,
			[NSNumber numberWithDouble: 0.5], kCIAttributeDefault,
			[NSNumber numberWithDouble: 0.0], kCIAttributeIdentity,
			kCIAttributeTypeScalar, kCIAttributeType,
			nil], kCIInputTimeKey,
		nil];
}

-(CIImage *)outputImage
{
	CISampler *src = [CISampler samplerWithImage: inputImage];
	CISampler *target = [CISampler samplerWithImage: inputTargetImage];
	return [self apply: sIrisFilterKernel, src, target, inputTime, kCIApplyOptionDefinition, [src definition], nil];
}

@end
This looks scarier than it is:
The initialize method just registers the class under the name "ULIIrisOpenFilter" and with a nice localized name that's human-readable, and assigns it one or more categories under which your application can group its filters in its user interface if it has a lot of them. The "filterWithName" method just creates an instance of the filter. Since your CIFilter class could be responsible for a whole bunch of similar filters,
The constructor loads the actual filter program written in Core Image Kernel Language from a text file named "ULIIrisOpenFilter.cikernel", compiles it for the current graphics card, and stashes it into a CIKernel object. Each function in the file ends up one object in the "kernels" array. We just grab the first function and stash it in a static variable.
The "customAttributes" method is really only useful if you want to auto-generate a user interface for your filter (many drawing applications do this): It essentially tells whoever wants to show UI for this filter the names of all the properties this filter has, their min/max values, a default value, the value that means "nothing gets changed" and so on.
The most important method is the "outputImage" method. Essentially, this method is called in a tight loop by CATransition to generate the frames of the animation. Imagine it like:
for( float currTime = 0.0; currTime <= 1.0; currTime += 0.01 )
{
	[theFilter setValue: [NSNumber numberWithFloat: currTime] forKey: kCIInputTimeKey];
	CIImage * currentFrame = [theFilter outputImage];

	// Do something to draw the image here.
}
So what does our outputImage method do? It creates CISampler objects for our two images. CISampler is a nice little wrapper object that lets you grab pixels from an image, and will interpolate properly if you ask for a coordinate between two pixels and do all sorts of nice things for you.
Then we call the CIFilter method "apply" to actually run our Core Image Kernel Language code. We first pass it the Kernel, then the three parameters that Kernel function takes (see below), and then some other stuff we don't care about right now. This call to "apply:" will return the output CIImage. Our Core Image Kernel is called once for each destination pixel that needs to be drawn.
So how does our Kernel language function look? Well, a simple one would look like this:
kernel vec4 fadeEffect(sampler image, sampler targetImage, float currTime)
{
	vec2 pos = samplerCoord(image);
	vec4 sourcePixel = unpremultiply(sample(image, pos));
	vec4 targetPixel = unpremultiply(sample(targetImage, pos));
	vec4 outputPixel;

	outputPixel.r = sourcePixel.r * (1.0 -currTime) +targetPixel.r * currTime;
	outputPixel.g = sourcePixel.g * (1.0 -currTime) +targetPixel.g * currTime;
	outputPixel.b = sourcePixel.b * (1.0 -currTime) +targetPixel.b * currTime;
	outputPixel.a = sourcePixel.a * (1.0 -currTime) +targetPixel.a * currTime;

	return premultiply(outputPixel);
}
this is a simple cross-fade. It grabs the current pixel from the source image (a coordinate is a vector of 2, x and y, named vec2, the pixel value itself is a vec4, a vector of 4 elements, r,), the pixel in the same position for the target image, and then generates an output image by mixing the red, green, blue and alpha values of these two pixels.
This is easily the most difficult part of writing the filter: You don't fire off drawing commands, you get asked to provide a value for a given pixel. So if you wanted to write a filter that simply shifts the image by one pixel to the right, you can't just use the source coordinate and add one, you have to go the opposite direction and subtract one from the destination coordinate.
Also, Core Image Kernel Language doesn't run on the CPU, so is a little more limited. For example, you can't write "if" statements, but you *can* use the ternary operator "?:" to return different values based on conditional expressions. A more complicated example would be an "iris open" effect that simply shows a circular section of the target image, growing larger until the target image fills the screen:
kernel vec4 irisOpenEffect(sampler image, sampler targetImage, float currTime)
{
	vec2 pos = samplerCoord(image);
	vec4 sourcePixel = unpremultiply( sample(image, pos) );
	vec4 targetPixel = unpremultiply( sample(targetImage, pos) );
	vec4 outputPixel;
	float biggerEdge = (samplerSize(image).x > samplerSize(image).y) ? samplerSize(image).x : samplerSize(image).y;
	float radius = (biggerEdge * 0.6) * currTime;

	outputPixel = (((pos.x - (samplerSize(image).x * 0.5)) * (pos.x - (samplerSize(image).x * 0.5)))
		+ ((pos.y - (samplerSize(image).y * 0.5)) * (pos.y - (samplerSize(image).y * 0.5)))
		< (radius * radius)) ? targetPixel : sourcePixel;

	return premultiply(outputPixel);
}
This looks a tad scarier, but really the only complicated part here is the circle equation, particularly since there it has to raise a few numbers to the power of two, which it does by writing out the equation twice. So it just tests whether the pixel lies inside or outside the circle, and then returns the source or target pixel. The remaining calculations are to calculate the circle's center so it is centered in the image, and to have the radius be dependent on currTime so the circle starts invisible and then grows larger.
Two more things to note here: samplerSize() is a function that gives you the size of a given image, its width and height. The unpremultiply() and premultiply() functions convert the pixel values from the format the graphics card uses (where components have the alpha already applied to them so compositing two images is faster) into the format a human would expect (where the different components of a color are independent of the alpha value) and back.
